How To Add Author Tracking In Google Analytics To Your WordPress Website
 We often work on media sites that have several authors, and the one essential statistic they all want to be able to track is author performance. Example sites we’ve worked on that have that need include:
The standard configuration of Google Analytics doesn’t have author tracking. However, they do allow customization of the data they track via custom dimensions.
To track authors, we need to add a custom dimension to Google Analytics. We’ll also need to update the Google Analytics script embedded in our site to capture author information.
If this all sounds a little daunting and technical, don’t worry. Just follow these instructions below.
Step 1: Login To Your Google Analytics Account
Login to your Google Analytics account and select the “Admin” area in the top navigation.

Once inside the Admin, you’ll see three sections. In the first section on the left, select the Account on which you want to work.
In the middle section, select the specific Property (website) you want to work on and open “Custom Definitions.”

When you open Custom Definitions, a sub-menu will appear. Select “Custom Dimensions” from the sub-menu.
Step 2: Create A Custom Dimension For Authors
Next, you’ll create a “Custom Dimension” by clicking on the big red “New Custom Dimension” button.

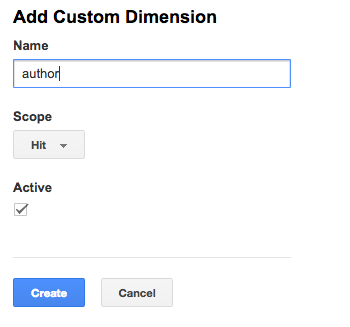
Name the new Custom Dimension “Author.” Leave the “Scope” dropdown as “Hit,” and also leave the “Active” box checked.
Save the Custom Dimension by clicking “Create.”
Step 3: Update Your Google Analytics Code
Hint: Pay close attention here. This part gets a little hairy if you’re not technically inclined.
Once the you have created the Custom Dimension, it’s time to update your Google Analytics code to capture the author name for tracking.
If you use the Genesis Framework, you may have embedded your Google Analytics code in the Genesis theme settings, in the “Header and Footer Scripts” area. Since we need to pass dynamic information to Google Analytics, we’ll have to move the script into our theme files.
Note : No matter where you code is currently embedded , be sure to remove it so you don’t load the script twice and inflate your metrics.
Even if you’re not using Genesis, just follow along. Everything below will still apply.
Copy your Google Analytics code, and drop it into a new file in your favorite text editor.
We’re going to change your Google Analytics Code to look like this:
Note: In this example, we’re using Universal Analytics. If your site is on the old Google Analytics, we recommend switching to Universal Analytics first. Also note, we’ve removed the <script></script> tags at the start and finish of the script. Save the file as google.js and upload that file to your current theme /js directory via FTP. If you don’t have a “js” subdirectory in your current theme, create one and upload the file there. Next, in your functions.php file add the following PHP code:
The reason we’re putting the code in different files is so that we can pass the php variable with the author name to Google Analytics and still enqueue our javascript for security.
Once you’ve completed Step 3 and saved your files, go to Google Analytics and make sure you’re still getting data by clicking on “Real Time” in the side navigation.
If no one is on your site right now, open your site homepage in a different browser. Using a different browser will ensure you’re not logged into WordPress which may cause Google Analytics not to track you, depending on how you have things set up.
Step 4: View Author Stats in Google Analytics
Now that we have everything set up, it’s time to start seeing how our authors are performing.
We can view the author statistics in several of the Google Analytics views. For the sake of illustration, I’m going to look at the most popular pages on the site and see who the authors of those pages are.
In Google Analytics navigate to Behavior > Site Content > All Pages.

In the window on the right, there is a drop down for “Secondary Dimension.”
Under that dropdown open “Custom Dimensions” and select “Author.”

This will add the author column to the report you are looking at.

From here you can sort, search, and view the information in any number of ways. You can also export the data from Google Analytics for further analysis in a spreadsheet.
Or…
We can set up a custom report in Google Analytics to automate some of the work.
Setting Up A Custom Report In Google Analytics
To create a custom report in Google Analytics, navigate to “Customization” in the main navigation and select “New Custom Report” under “Custom Reports.”

We now have a new custom report window to define the report.
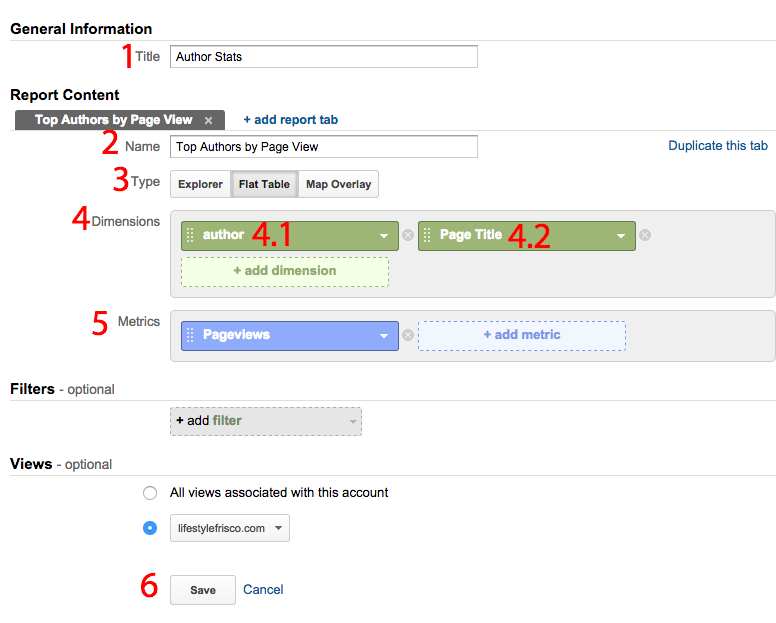
- Name the overall report (you can have several related tabs in a report). For this report, I’ve chosen to call it “Author Stats.”
- Next, under “Report Content” name the individual tab. I’ve chosen to call this one “Top Authors by Pageview.”
- Select Type: “Flat Table.”
- In “Dimensions”
- Slot 1 “add dimension“: Select “Author” from “Custom Dimensions“
- Slot 2 “add dimension“: Select “Page Title” from “Behavior”
- In “Metrics” select “Pageviews” from “Users.”
- Leave everything else as it is and click “Save.”
Hint: When choosing a dimension, you’ll see a search box when you click “add dimension.” You can start typing the name of the dimension you want rather than clicking through everything.
You can now view your custom report with top pages and their associated authors for quick reference!
Frequently Asked Questions:
1. Why do I need to add my code to different files and enqueue the scripts?
The main reason is for security purposes. It is always a good idea to enqueue javascript files for use in WordPress to prevent hackers from exploiting them. This situation has added complexity because we want to pass a php variable (author name) into javascript so that it can be passed to Google Analytics. Since we want to enqueue our scripts for security, breaking things up was the most logical way to handle it.
Though, if you have other suggestions, feel free to leave them in the comments below.
2. How do I view authors by total page views?
In short, you’ll add another tab to your custom report that is exactly the same as the first tab we created but without the “Page Title” dimension.
3. How long will it take before I see author data?
It may take up to 24hrs before you start seeing author data in Google Analytics.
My theme didn’t have a js folder. So I just created a js folder in the active theme’s folder and put the second code plainly into a file titled google.js. Is this what you would advise? Thanks for the effort on the tutorial.
That is exactly correct.
Another question, can this same method be used to track the_modified_author (the user who clicks “publish” on a post — not always but sometimes the same as the user who composes the post.
It’s code is basically
Could you suggest how to track this custom in Analytics?
JMunce, Not sure how that would work since in most instances only one author is displayed client side and that is what GA picks up on.
The commenting tool deleted my code, which is pacman-questionmark-php-the_modified_author bracketbracket-semicolon-questinomark reversepackman
The codex says wp_print_scripts is deprecated. Is there a reason you’re using it instead of wp_enqueue_scripts? (https://codex.wordpress.org/Plugin_API/Action_Reference/wp_print_scripts)
We should be using wp_enqueue_scripts… corrected and thanks for catching that. I think we were trying different things and that got overlooked. Regardless, great catch and thank you!
Implemented the method, working perfectly, thanks! One question though: Why did you choose custom dimensions over custom variables? I was doing some research and found an article where a method using custom variable was shown. I think Yoast’s GA plugin for WordPress also follows/used to follow the same method.
Abhijeet, Custom Dimension are the evolution of Custom Variables. If you’re using Universal Analytics then you’ll want to use Custom Dimensions.
I saw that you had “category” as a custom dimension in one of your screenshots. Can you provide the additional code to track a WordPress category as well?
Maureen,
Haven’t actually flushed that out yet. I started but didn’t finish. I’ll do an update here as soon as I get it working. Good eyes! 🙂
Thanks Scott!
Any luck with categories?
Hi Scott,
I have implemented everything according to your article but I am stuck at a point. Everything works fine until I make changes to an article. After changes are made to an article, the data stops collecting for the author. Can you tell me why this happens and whats the solution?
Maninder, I have no idea why that would happen. Did it ever work itself out for you? I’ll poke around and see if I can find out why that would happen.
Hi,
Thank you for the great post.
The thing is, I’m kind of ‘slow’ when it comes to technical stuff and I’m having an issue reproducing this and I wanted to see if you could help me. I’ll describe what I’m doing:
– I created the custom dimension exactly as described. No problem so far.
– I disabled the Google Analytics for WP plugin so I don’t mess up
– I added my own GA code to a file created by me from scratch called google.js, making modifications so it looks like the one you put there (removing , adding the extra lines, etc.)
– I uploaded the file to the /js folder I had inside /wp-admin (Analytics not tracking anything so far)
– I took the PHP code exactly as it is, copied it and pasted it to functions.php (also inside /wp-admin)
After uploading it, I got this error:
Fatal error: Call to undefined function add_action() in /home/……../wp-includes/functions.php on line 170
Line 170 correponds to this line:
add_action( ‘wp_enqueue_scripts’, ‘google_load_file’ );
Why is the function undefined? Am I missing something so obvios that you did not put here and I might not know? Am I doing something wrong?
Thank you again!!
After having created the Google.js should we delete the Google analytics script that was in the header?
Yes, otherwise you’ll inflate your analytics.
Will this work on historical data or will tracking commence once implemented?
Eric,
Unfortunately not. I will only work moving forward.
Good tutorial. It’s a good method to track, but I’m finding another more simple.
Adriam,
You’re more than welcome to share a link if there is another tutorial on how to accomplish this more simply. Otherwise, if you would like to contribute to this post let me know.
Hi Scott!
Your work is very useful, but this can be a quick fix for those who find it difficult:
https://es.wordpress.org/plugins/better-analytics/
Best regards!
Hey Scott
First – thanks for the awesome tutorial. Just what I needed. This is going to make tracking on some my sites so much easier.
I saw you mention above you were looking at also adding the ability to track categories. Did you ever go through with that? Would love to see that as well.
Thanks man!
Brett,
Glad you found it useful. I have not written up the part about the categories but thank you for the nudge. I’ll work on that in the next week and update the post.
Hi,
Great article – this is exactly what I am looking for. I can’t wait to see the results.
Could this be done using Google Tag Manager?
Heather, possibly but I don’t really know. Haven’t tried it.
Thanks for the great information . The best Google Analytics wordpress plugin which I use for my website is (Google Analytics Counter Tracker ). It is easy and very simple to use You can know more about it on this link https://wordpress.org/plugins/.. It is free and it gives me the statistics of the visitors on my website hourly,daily,weekly and monthly. There is also a pro version available that helps to use counter widget and provides more expanded statistics.
Great article. I’d also like to recommend Google Analytic Counters Tracker
Plugin. It analyses the visitors hits on your websites and displays it
graphically. It is also simple and easy to use. You can access it from
the link, below:
https://wordpress.org/plugins/analytics-counter/
I prefer to use Google Analytics Counter Tracker plugin on WordPress. It is Very simple and easy to use.You can Connect your Google Analytics account and get Google Analytics stats;
Group stats by hour, day, month and year. Go to https://wordpress.org/plugins/analytics-counter/ for more information.
That’s great recommendation, i agree is very useful. Try Google Analytics Counter Tracker.
Great Tutorial.. But I wanted something more if you could help me. I want to share this report to my authors dashboard. Every individual author could see only his/her data in his/her dashboard. How can I.
Amit,
Unfortunately I don’t know. You can share a dashboard but it will have all of the info, not just “one author at a time” without creating multiple individual dashboards.
Scott
Hi Scott,
Thanks for this post! I used to pass a different variable to Analytics.
I have removed the “true”, at the end of the wp_enqueue_script line on functions.php to make the code load inside the tag, since Google states that the earlier the script is loaded the better. Do you see any reason why this might not be a good idea? Thank you!
Andre, not unless you notice it slowing down the rendering of the page. It shouldn’t but some SEO crawlers will alert you to render-blocking scripts. I don’t have reason to believe this would be one but keep an eye on it.
But the biggest reason to keep it in the footer is page performance.
I’m trying to pass other variables as well. Can someone help me figure out what the correct functions to use for category name, post title, and post type?
Thank you in advance,
function google_load_file() {
$this_post = get_queried_object();
$author_id = $this_post->post_author;
$author_name = get_the_author_meta(‘display_name’, $author_id);
$category = $this_post->post_category;
$category_name = get_the_category(‘cat_name’, $category);
$title = $this_post->post_title;
$p_title = get_the_title(‘title’, $title);
$type = $this_post->post_type;
$p_type = get_post_meta(‘post_type’, $type);
wp_enqueue_script( ‘ga’, get_stylesheet_directory_uri() . ‘/js/google.js’, array(), ‘1.0.0’, true );
wp_localize_script( ‘ga’, ‘customData’, array( ‘author_name’ => $author_name,
‘post_category’ => $category_name,
‘post_title’ => $p_title,
‘post_type’ => $p_type ) );
}
add_action( ‘wp_enqueue_scripts’, ‘google_load_file’ );
First off, thank you for these easy to follow instructions. I implemented all of the above on my website and analytics, and currently see 0 across the dashboard when I set the secondry dimension as author (see here: http://i.imgur.com/1wvm21F.jpg). Is this normal for having just set it up 12 hours ago? Also, will this populate past data, too (ie- if I wanted to see how many pageviews a certain author received in total for the month of February, for instance)?
Thanks kindly in advance for your response.
It typically takes at least 24 hours.
Thanks for the quick response.
We’re over 3 days now and it’s still showing 0 across all categories with “There is no data for this view.” when I select to show the secondary dimension ‘Author’. Figuring a mistake may have been made I went back and checked through all the steps on my end. All was followed as per your instructions. Is this an issue you’ve seen happening for others? Any advice is appreciated in advance. Thanks again.
I haven’t seen this happen else where. But in the page source it looks like you’re not including the analytics.js file properly.. look there.
I’m wondering how to set the author’s goal to be counted in Google Analytics.